How to disable SmartScreen on Windows 10
If you are tired of having to bypass SmartScreen every time you want to run an (unsigned) application on Windows 10, you can opt to disable the SmartScreen malware filter entirely. To avoid getting your computer infected with real threats, such as viruses and other types of malware, make sure you have enabled Windows Defender or another anti-virus program.
Follow the below steps to disable (or enable) SmartScreen on Windows 10.
1. Open the Windows Settings panel
Click the Start menu button at the bottom left of your screen, then click the cogwheel icon (it may or may not have "Settings" written next to it) to enter the Windows Settings panel.

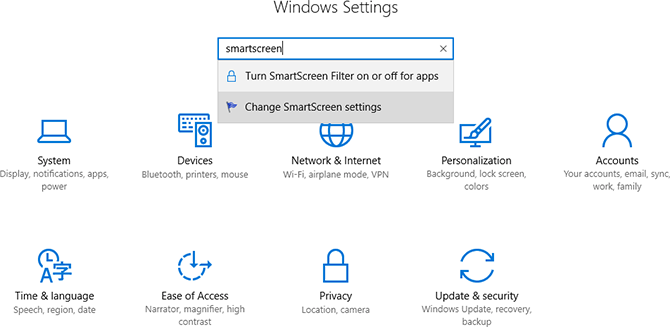
2. Search for SmartScreen
Type "smartscreen" into the search box, then click the "Change SmartScreen Settings" link. You may be tempted to click the "Turn SmartScreen Filter on or off for apps" link instead, but this won't actually bring you to the menu you need to disable Windows SmartScreen.
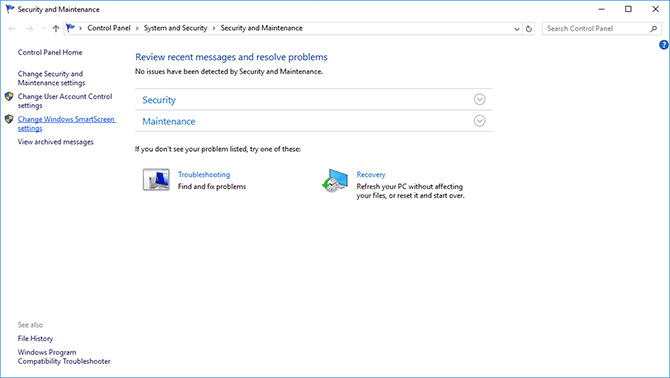
3. Enter the SmartScreen Settings panel
You are now in the Security & Maintenance panel. Locate and click the "Change Windows SmartScreen settings" link in the left sidebar to open up the SmartScreen settings panel.
4. Disable SmartScreen
In the Windows SmartScreen settings panel, simply tick the box in front of "Don't do anything (turn off Windows SmartScreen)" and finally click the "OK" button.

You have now disabled SmartScreen on Windows 10. To re-enable SmartScreen, follow the same steps but select "Warn before running an unrecognized app" instead.
Need help? Have questions?
We're here to help. Post your question or problem on our message board.